Red Velvet Marble Waffles
Start your day with a twist on the classic waffle with these Red Velvet Marble Waffles. Combining the flavors of chocolate and vanilla, they create a beautiful presentation on your breakfast plate. Perfect for special occasions or a fun family brunch, these waffles are sure to impress. Enjoy them warm, topped with your favorite syrup and fruits for an unforgettable meal.

Why This Red Velvet Marble Waffles Recipe Works
This recipe stands out because it combines the rich flavors of red velvet with the lightness of waffles, creating a delightful breakfast treat. The marbling effect not only looks beautiful but also provides a wonderful contrast in flavor that excites the palate. Using buttermilk adds moisture and tenderness, making each waffle fluffy yet sturdy enough to hold toppings.
The technique of swirling the batters creates a stunning visual effect that is sure to impress. By carefully layering the batters, you can achieve the perfect balance of flavors with every bite. Each waffle cooks to a beautiful golden brown, ensuring that every serving is as delicious as it is visually appealing.
💡 Professional Tip
For the best results, make sure your ingredients are at room temperature before mixing. This helps create a smoother batter and ensures even cooking. Additionally, preheating your waffle iron is crucial—if it's not hot enough, the waffles will be soggy instead of crispy.
Frequently Asked Questions
Yes, you can make Red Velvet Marble Waffles ahead of time! Simply prepare the waffles and let them cool completely. Once cooled, store them in an airtight container in the fridge for up to 2 days. When ready to serve, reheat them in a toaster or oven for a few minutes until warm and crispy.
If you don't have buttermilk on hand, you can easily make a substitute by mixing 1 cup of milk with 1 tablespoon of lemon juice or vinegar. Let it sit for about 5 minutes until it thickens slightly. This will provide a similar acidity and moisture needed for the waffles.
The waffles are done when they turn a golden brown color and the steam coming from the waffle iron diminishes significantly. It’s important not to open the waffle iron too soon, as this can cause the waffles to stick and lose their shape. Once ready, they should be crisp on the outside and soft inside.
Absolutely! You can freeze Red Velvet Marble Waffles for up to 2 months. Just make sure they are completely cooled before placing them in a single layer on a baking sheet. Once frozen, transfer them to a freezer-safe bag or container. When you’re ready to enjoy them, reheat in the toaster or oven directly from the freezer.
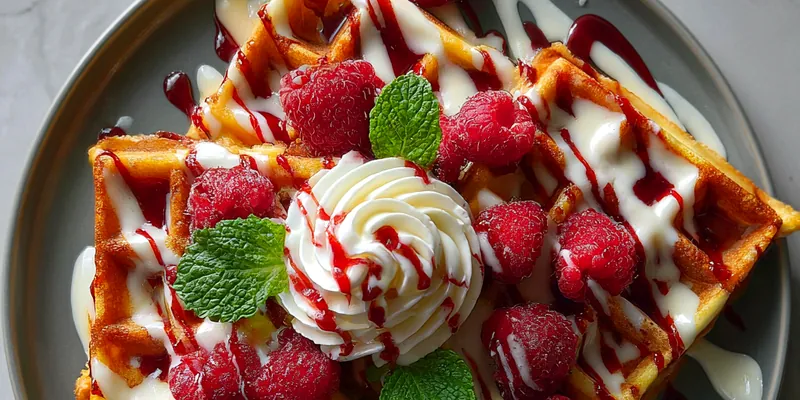
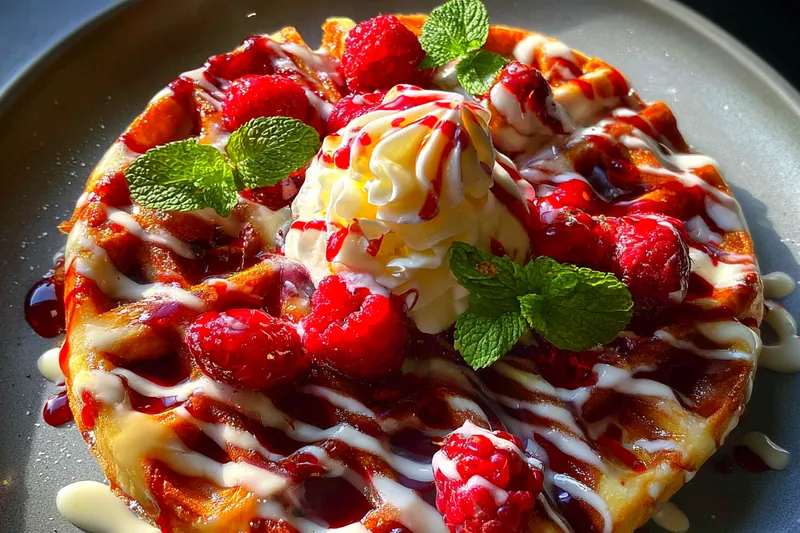
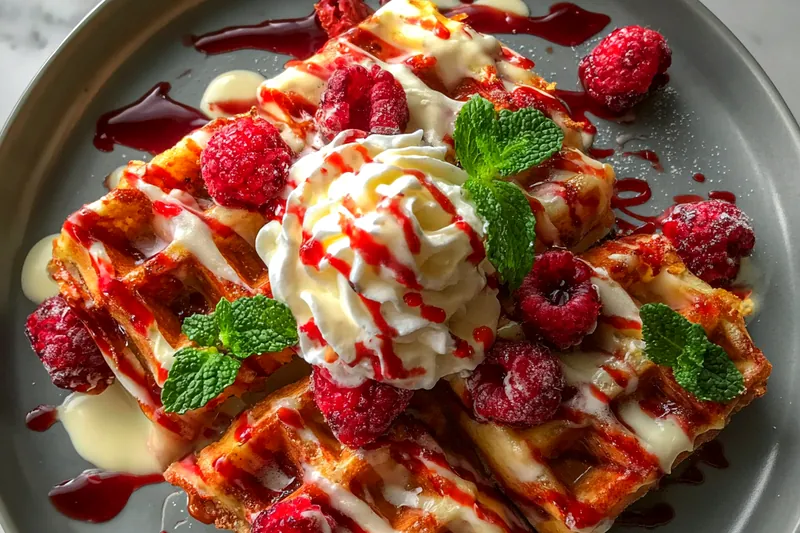
These waffles pair wonderfully with whipped cream, maple syrup, and fresh berries. You can also add a sprinkle of powdered sugar for an extra touch of sweetness. For a decadent twist, serve with a scoop of vanilla ice cream on top for dessert-style waffles.
In the fridge, Red Velvet Marble Waffles will last for about 2 days when stored in an airtight container. To keep them fresh and delicious, reheat them in a toaster or microwave before serving.
Yes, you can prepare the batter in advance and store it in the refrigerator for up to 24 hours. Just give it a good stir before using. However, for the best texture, it’s recommended to cook the waffles fresh just before serving.
The best way to reheat Red Velvet Marble Waffles is by using a toaster or an oven. For the toaster, set it to medium and pop the waffles in until warmed through and crispy. In the oven, preheat to 350°F (175°C) and bake for about 5-10 minutes until heated through.
Recipe Troubleshooting Guide
Too Dry
Problem: If your waffles come out too dry, it could be due to overmixing or using too much flour.
Solution: To avoid this, make sure to gently fold the ingredients until just combined. Use a kitchen scale for precise measurements, or spoon the flour into the measuring cup instead of scooping it directly.
Not Crispy Enough
Problem: If your waffles are not crispy, it may be due to insufficient cooking time or a low temperature on the waffle iron.
Solution: Ensure that your waffle iron is fully preheated and adjust the temperature if possible. Cooking for a little longer can also help achieve a crispier texture.
Overcooked
Problem: Overcooked waffles can become tough and dry, often with a burnt exterior.
Prevention: To prevent this, keep a close eye on the cooking time and check for the golden brown color before removing them from the iron.
Undercooked Center
Problem: An undercooked center can leave the middle of the waffle gooey and unappetizing.
Recovery: Make sure to let the waffles cook sufficiently and consider lowering the temperature if the exterior is browning too quickly while the inside remains raw.
Burnt Exterior
Problem: If the waffles have a burnt exterior but the inside is undercooked, it indicates the temperature is too high.
Prevention: Lower the heat setting on your waffle iron and check the cooking time to find the right balance for perfectly cooked waffles.
Flavor Balance
Too Sweet: If your waffles are too sweet, try reducing the sugar in the batter by a few tablespoons next time.
Too Salty: If the waffles taste too salty, double-check your measurements, especially with salt and baking powder.
Bland: If the waffles are bland, consider adding more vanilla extract or a pinch of cinnamon for enhanced flavor.
Essential Ingredients for Red Velvet Marble Waffles
Key ingredients in this recipe include all-purpose flour, cocoa powder, and buttermilk. These ensure the perfect texture and flavor. The red food coloring not only provides the iconic color but also adds a whimsical touch to your breakfast. The combination of baking powder and eggs helps achieve a light and fluffy waffle.
When selecting ingredients, opt for high-quality cocoa powder and fresh buttermilk for the best results. Using fresh eggs can also enhance the texture of the waffles. The quality of your ingredients directly affects the flavor and overall success of the dish.
Essential Ingredient Notes
- All-Purpose Flour: Use a high-quality all-purpose flour for the best texture in your waffles. Avoid overly bleached flour, as it can affect the taste and consistency of the batter. For a gluten-free option, consider using a gluten-free flour blend, but the texture may vary slightly.
- Cocoa Powder: Choose unsweetened cocoa powder for a rich chocolate flavor without added sugars. Dutch-processed cocoa can enhance the color but may result in a milder chocolate taste. Always sift cocoa powder before adding to the batter to avoid lumps.
- Buttermilk: Buttermilk adds tanginess and moisture to your waffles, making them fluffy and tender. If you can't find buttermilk, making a substitute is easy. Just mix milk with a bit of vinegar or lemon juice and let it sit for a few minutes. This will mimic the acidity and achieve similar results.
Step-by-Step Cooking Process
The cooking process for Red Velvet Marble Waffles is straightforward yet rewarding. By mixing the wet and dry ingredients separately, you ensure a smooth batter without lumps. The marbling technique creates an eye-catching presentation that will wow your family and friends.
To achieve perfect results, make sure your waffle iron is preheated adequately. Adjusting the cooking time as needed will also help you find that sweet spot between crispy and fluffy. Enjoy the delightful aroma filling your kitchen as these waffles cook to perfection.
Key Technique for Perfect Red Velvet Marble Waffles
The marbling technique is the key to these waffles’ stunning appearance and enjoyable flavor. By layering the different batters and using a toothpick to swirl them together, you create a beautiful visual effect that enhances the eating experience. Mastering this technique will elevate your waffle-making game significantly.
Red Velvet Marble Waffles
📋 Ingredients
Main Ingredients
- 1 cup butterRoom temperature
- 1 cup powdered sugarSifted
- 1 teaspoon vanilla extractFor flavor
- 2 tablespoons milkAdjust for consistency
- 1/4 cup cream cheeseSoftened
For the Sauce
- 2 cups all-purpose flourFor structure
- 1 cup buttermilkFor moisture
- 1 tablespoon baking powderFor fluffiness
- 2 large eggsFor binding
- 1/2 cup granulated sugarFor sweetness
- 1/2 cup vegetable oilFor moisture
- 1 teaspoon vanilla extractFor flavor
- 2 tablespoons cocoa powderFor chocolate flavor
- 2 tablespoons red food coloringFor color
- 1/4 teaspoon saltFor balance
- 1/2 cup chocolate chipsOptional for extra sweetness
Instructions
Mix Dry Ingredients
In a large bowl, whisk together the flour, baking powder, cocoa powder, and salt until evenly combined.
Combine Wet Ingredients
In another bowl, mix the buttermilk, eggs, granulated sugar, vegetable oil, and vanilla extract until smooth.
Color the Batter
Divide the wet mixture into two separate bowls. In one bowl, add the red food coloring and mix well.
Combine Mixtures
Gradually add the dry ingredients to both bowls, mixing until just combined. Do not overmix.
Prepare Waffle Iron
Preheat your waffle iron according to the manufacturer's instructions.
Create Marble Effect
Pour a ladle of the red batter into the center of the waffle iron, followed by a ladle of the plain batter. Use a toothpick to swirl the batters together slightly.
Cook Waffles
Close the waffle iron and cook according to the manufacturer's instructions, typically for about 4-5 minutes until golden brown.
Serve
Remove the waffles carefully and serve warm with whipped cream, maple syrup, and optional berries.
Recipe Notes & Tips
Storage Tips
To ensure your Red Velvet Marble Waffles stay fresh, store them in an airtight container. They can be kept in the fridge for up to 2 days or frozen for longer storage. Just make sure they are completely cooled before keeping them in the refrigerator or freezer.
Serving Suggestions
These waffles are delightful served with a dollop of whipped cream and a drizzle of maple syrup. You can also add fresh fruits like strawberries or blueberries to enhance the flavor and presentation. For an extra indulgence, consider pairing them with vanilla ice cream.
Recipe Variations
Feel free to experiment with this recipe! You can add chocolate chips or nuts to the batter for extra texture. If you prefer a lower sugar version, reduce the sugar or substitute with a natural sweetener. For a gluten-free alternative, swap the all-purpose flour with a gluten-free blend.