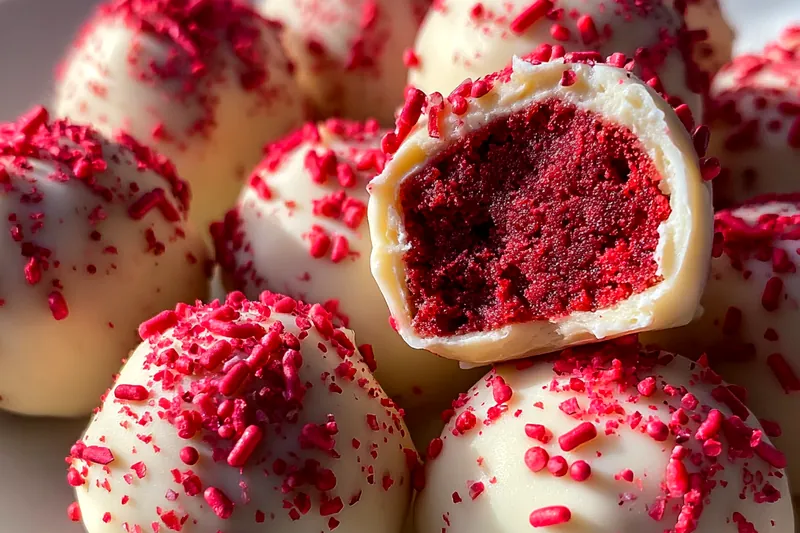
Red Velvet Cake Balls
Red Velvet Cake Balls are a delightful twist on the classic red velvet cake, offering a fun and easy way to enjoy this beloved flavor. They are perfect for parties, celebrations, or simply as a sweet treat to enjoy at home. With a rich red color and creamy frosting center, these cake balls are sure to impress everyone. Let’s dive into making these delicious bites!


Why This Red Velvet Cake Balls Recipe Works
This recipe for Red Velvet Cake Balls works beautifully because it combines the classic flavors of red velvet cake with the simplicity of an easy-to-make dessert. The use of cream cheese frosting adds a rich and creamy texture that pairs perfectly with the soft cake. These cake balls are a great way to use up leftover cake while offering a delightful treat.
The technique of chilling the cake balls before coating them in chocolate ensures that they hold their shape and gives the chocolate a perfect finish. The combination of flavors and textures makes these cake balls incredibly satisfying and a hit at gatherings.
💡 Professional Tip
For the best results, make sure your cake balls are completely chilled before dipping in chocolate. This prevents them from falling apart and helps the chocolate coating adhere better. Use high-quality white chocolate for a smoother and richer flavor.
Frequently Asked Questions
Absolutely! You can prepare the cake balls a day in advance and store them in the refrigerator. Just ensure they are covered well to prevent drying out. They can be served chilled or at room temperature when ready to enjoy.
If you prefer a different flavor, you can substitute cream cheese frosting with buttercream or even chocolate ganache. Keep in mind that each frosting will impart a different taste to the cake balls, but they will still be delicious.
The cake balls are done when they are firm to the touch and hold their shape after being rolled. Remember, they are not baked again after being formed, so the initial baking of the cake is what determines their doneness.
Yes, you can freeze the cake balls! Make sure they are fully set, then place them in an airtight container. They can be frozen for up to three months. When ready to eat, simply thaw them in the refrigerator overnight.
These cake balls pair wonderfully with a cup of coffee or a glass of milk. You can also serve them alongside other desserts for a sweet treat platter at parties or gatherings.
Red Velvet Cake Balls will last about 4-5 days in the refrigerator when stored properly in an airtight container. For the best taste and texture, enjoy them within the first few days.
Definitely! They can be made a day or two in advance. Just store them in the refrigerator, and they’ll be ready to serve when you are. They also taste great after chilling for a while!
Since Red Velvet Cake Balls are best enjoyed chilled or at room temperature, there’s typically no need to reheat them. If they have been frozen, allow them to thaw in the refrigerator before serving.
Recipe Troubleshooting Guide
Too Dry
Problem: If your cake balls turn out dry, it’s likely due to overbaking the cake or not enough frosting.
Solution: To prevent dryness, always monitor the baking time and add more frosting to the crumbled cake if needed to achieve the right moisture level.
Not Crispy Enough
Problem: The chocolate coating may not be crispy if it was not melted properly or if too much shortening was added.
Solution: Ensure the chocolate is melted until smooth and consider reducing the shortening for a firmer coating.
Overcooked
Problem: If the cake is overcooked, the cake balls will be dry and crumbly.
Prevention: To prevent overcooking, always keep an eye on the cake as it bakes, and test it with a toothpick to remove it from the oven as soon as it comes out clean.
Undercooked Center
Problem: If the center of the cake balls is still gooey, it may be because the cake wasn’t baked long enough.
Recovery: Ensure the cake is fully cooked before crumbling. If you find an undercooked center, you can bake the cake a little longer next time for better results.
Burnt Exterior
Problem: A burnt exterior usually results from baking the cake at too high a temperature or for too long.
Prevention: Always follow the recommended baking temperature and check the cake periodically to prevent burning.
Flavor Balance
Too Sweet: If the cake balls are too sweet, consider reducing the amount of frosting used in the mixture.
Too Salty: If the cake balls taste too salty, double-check the amount of salt added to the cake mix and frosting.
Bland: If the cake balls are bland, try adding more vanilla extract or even a hint of cocoa powder to enhance the flavor.

Essential Ingredients for Red Velvet Cake Balls
The key ingredients for Red Velvet Cake Balls include red velvet cake mix, buttermilk, and cream cheese frosting. The cake mix provides the vibrant color and unique flavor, while the buttermilk adds moisture. Cream cheese frosting contributes a deliciously rich taste that complements the cake perfectly.
Quality matters! Use high-quality ingredients for the best results. Fresh eggs and real buttermilk enhance flavor, while premium white chocolate ensures a smooth, decadent coating. These small choices can make a big difference in the final product.
Essential Ingredient Notes
- Red Velvet Cake Mix: Choose a brand that uses natural cocoa powder for the best flavor and color. Look for mixes that have a good balance of flavor without being overly sweet.
- Cream Cheese Frosting: Store-bought frosting works well, but making your own can elevate the flavor. Use room temperature cream cheese for a smooth consistency that blends seamlessly with the cake.
- White Chocolate: Opt for high-quality white chocolate for melting. Avoid chocolate chips, as they may not melt properly. Look for bars or blocks that specifically mention they are for melting or baking.
Step-by-Step Cooking Process
Making Red Velvet Cake Balls is a straightforward process that involves baking, crumbling, and rolling. Start by preparing the cake according to the box instructions, then once cooled, crumble it into fine pieces. Mixing it with frosting brings the mixture together for easy ball formation.
The key to perfect cake balls is in the chilling process. This helps them hold their shape when rolling and dipping in chocolate. Ensure that the chocolate is properly melted and smooth for an even coating that looks professional.
Key Technique for Perfect Red Velvet Cake Balls
The most important technique is chilling the cake balls before coating them in chocolate. This step ensures that they maintain their shape and prevents the chocolate from cracking. Additionally, using quality chocolate for coating will elevate the overall taste and presentation.
Red Velvet Cake Balls
📋 Ingredients
Main Ingredients
- 8 oz white chocolateMelted for coating
- 2 tablespoons vegetable shorteningTo thin out the chocolate
For the Coating
- 1 box red velvet cake mixFollow box instructions
- 1 cup buttermilkFor moisture
- ½ cup vegetable oilAdds richness
- 3 large eggsFor binding
- 1 teaspoon vanilla extractFor flavor
- 1 cup cream cheese frostingFor filling
- Sprinkles for garnishOptional decoration
Instructions
Bake the Cake
Preheat your oven to 350°F (175°C). Prepare a 9x13 inch baking pan by greasing it...
Cool the Cake
Once baked, remove the cake from the oven and allow it to cool in the pan for about 10 minutes...
Crumble the Cake
After the cake has cooled, crumble it into a large mixing bowl...
Mix with Frosting
Add the cream cheese frosting to the crumbled cake. Use your hands to mix it together...
Form Balls
Scoop out small portions of the mixture (about 1 inch in diameter) and roll them into balls...
Chill the Cake Balls
Refrigerate the cake balls for at least 30 minutes to firm up...
Melt Chocolate
In a microwave-safe bowl, combine the white chocolate and vegetable shortening...
Coat the Cake Balls
Dip each cake ball into the melted chocolate, allowing any excess to drip off...
Garnish and Serve
Before the chocolate sets, sprinkle the tops with sprinkles. Allow the cake balls to set completely...
Recipe Notes & Tips
Storage Tips
To properly store Red Velvet Cake Balls, keep them in an airtight container in the refrigerator. This will help maintain their freshness and texture. They can also be frozen for longer storage, just ensure they are separated to prevent sticking.
Serving Suggestions
Serve Red Velvet Cake Balls on a decorative platter for special occasions, or enjoy them as a sweet snack with coffee or tea. They also make great gifts when packaged in cute boxes.
Recipe Variations
For a twist, try adding crushed nuts or coconut flakes to the cake mixture. You can also use different types of chocolate for coating, or add flavors like mint or orange zest to the frosting for a unique touch.