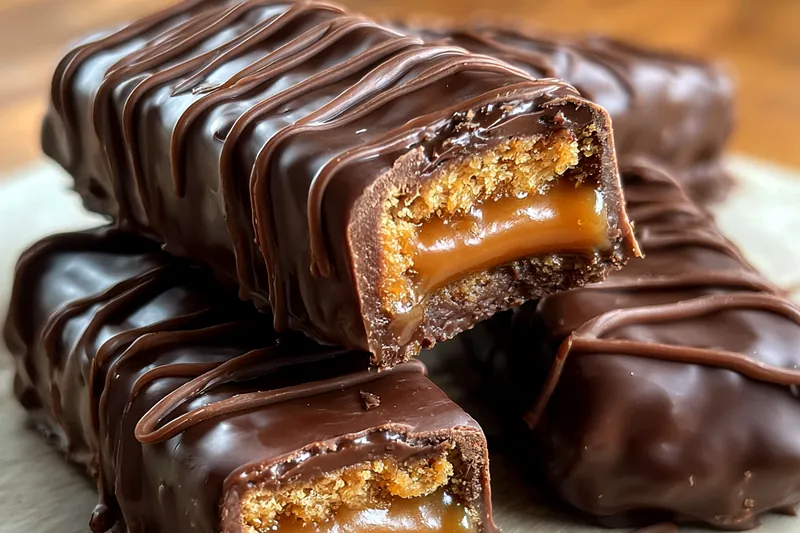
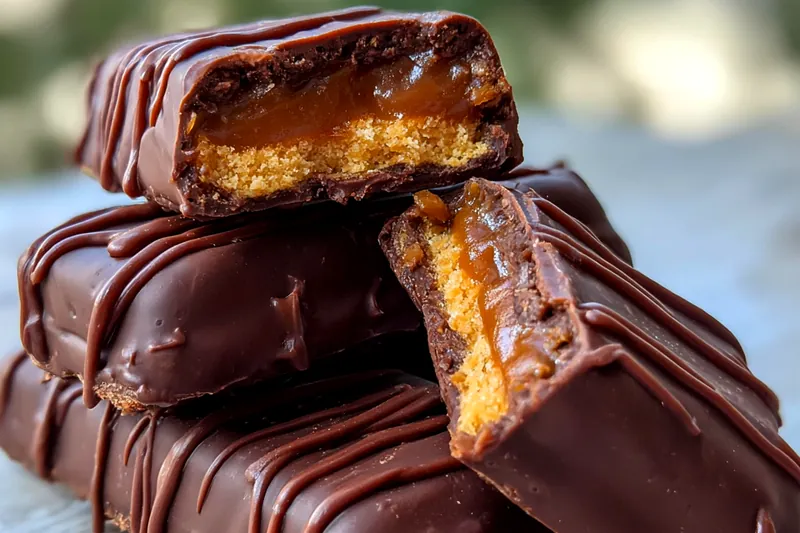
Homemade Chocolate Caramel Bars
These Homemade Chocolate Caramel Bars are a delightful dessert that combines rich chocolate and gooey caramel in every bite. Perfect for sharing at gatherings or enjoying as a sweet treat at home, they are surprisingly easy to make. With a simple list of ingredients, you can create a dessert that will impress everyone. Indulge in the ultimate combination of flavors with these bars that are sure to satisfy your sweet tooth!


Why This Homemade Chocolate Caramel Bars Recipe Works
This recipe stands out because it effortlessly combines rich chocolate flavor with a gooey caramel center. The layers create a delightful texture contrast, making each bite a mouthwatering experience. Additionally, the use of simple ingredients means that anyone can whip these bars up with ease. It’s a classic recipe that never goes out of style and appeals to all ages.
The technique used in this recipe is key to achieving the perfect consistency. By baking the bottom layer first before adding the caramel, you ensure that the crust remains firm and supportive. Moreover, the careful mixing and layering of ingredients help to avoid any sogginess, resulting in a bar that is both crunchy and chewy.
💡 Professional Tip
For the best results, allow the bars to cool completely before cutting them. This will help the layers set properly and make slicing much easier. Additionally, using high-quality chocolate and caramel sauce will significantly enhance the flavor of the finished product.
Frequently Asked Questions
Yes, you can make these bars ahead of time! They store well in the refrigerator for up to a week. Just be sure to allow them to cool completely before covering them to prevent moisture buildup. You can also freeze them for up to three months; just wrap them tightly in plastic wrap and then in foil.
If you need a substitute for butter, you can use coconut oil or margarine. While the flavor might differ slightly, these alternatives will still provide the necessary fat content to maintain the texture of the bars. Additionally, you might consider using a vegan butter for a dairy-free option.
You’ll know the bars are done baking when the edges are golden brown and the center is set. A toothpick inserted into the center should come out mostly clean, with only a few moist crumbs attached. Avoid overbaking, as this can lead to dry bars.
Absolutely! These bars freeze beautifully. Just make sure they are completely cooled, then wrap them tightly in plastic wrap followed by aluminum foil. They can be frozen for up to three months, and you can thaw them in the refrigerator overnight before serving.
These bars pair wonderfully with a scoop of vanilla ice cream or a dollop of whipped cream. For an extra touch, drizzle some chocolate or caramel sauce on top. They also make a great accompaniment to coffee or tea for a delightful afternoon treat.
In the refrigerator, these bars can last for up to a week if stored in an airtight container. Make sure to let them cool completely before storing to maintain their texture. If you notice they start to dry out, consider adding a slice of bread to the container to help keep them moist.
Yes, making them in advance is a great idea! They actually taste better after a day of resting, as the flavors meld together. Just make sure to store them properly in the refrigerator or freezer as previously mentioned, and you’ll have a delicious treat ready to go when you need it.
To reheat the bars, place them in the microwave for about 10-15 seconds on low power. This will warm them slightly without melting the chocolate too much. If you prefer, you can also reheat them in a preheated oven at 300°F (150°C) for about 5-10 minutes.
Recipe Troubleshooting Guide
Too Dry
Problem: Your bars may have turned out dry if they were overbaked or if the moisture balance was off.
Solution: To prevent dryness in the future, ensure you keep an eye on the baking time and check for doneness early. You can also add an extra egg or a splash of milk to the mixture to keep it moist.
Not Crispy Enough
Problem: If the bars lack crispness, they may not have been baked long enough or the butter content was too high.
Solution: To achieve a crispier texture, try baking them a few minutes longer, and ensure you measure the butter accurately. Allowing them to cool on a wire rack can also help maintain their texture.
Overcooked
Problem: Overcooked bars can become tough and dry, which is not ideal.
Prevention: To avoid this, set a timer and check for doneness a few minutes before the recommended baking time. Using an oven thermometer can help ensure your oven is at the correct temperature.
Undercooked Center
Problem: An undercooked center can result in a gooey and unappetizing texture.
Recovery: If you find your bars are undercooked, return them to the oven for an additional 5-10 minutes, checking frequently until the center is set.
Burnt Exterior
Problem: Burnt edges can occur if the temperature is too high or if the bars are left in too long.
Prevention: To prevent burnt edges, consider lowering the oven temperature slightly and covering the edges with foil if they begin to darken too quickly.
Flavor Balance
Too Sweet: If the bars are too sweet, consider reducing the amount of sugar next time or adding a pinch of salt to balance the sweetness.
Too Salty: If they taste too salty, check the salt measurement and use unsalted butter in the future.
Bland: If the flavor is bland, try adding more vanilla extract or a touch of espresso powder to enhance the chocolate flavor.
Essential Ingredients for Homemade Chocolate Caramel Bars
The essential ingredients for this recipe come together to create the perfect balance of texture and flavor. The combination of butter, sugars, and chocolate forms a rich base, while the caramel adds that gooey, indulgent layer. Each ingredient plays a vital role in ensuring the bars are both satisfying and delicious.
Using high-quality chocolate and pure vanilla extract will make a noticeable difference in the overall flavor. Opt for semi-sweet chocolate chips and a good brand of caramel sauce for the best results. Fresh ingredients also contribute to the taste, so always check for quality when shopping.
Essential Ingredient Notes
- Unsalted Butter: Unsalted butter allows you to control the saltiness of the recipe. Ensure it's at room temperature for easier mixing, which helps create a smoother batter for the bars.
- Chocolate Chips: Using semi-sweet chocolate chips provides the perfect balance of sweetness and richness. They melt beautifully and create a luscious chocolate layer that complements the caramel.
- Caramel Sauce: Choose a high-quality caramel sauce for the best flavor. If you prefer a homemade version, make sure to cook it just until it reaches a smooth consistency without burning.
Step-by-Step Cooking Process
The cooking process for these bars is straightforward and beginner-friendly. By layering the ingredients and following the steps carefully, you can ensure an even bake and the best texture. The initial baking of the crust is crucial to achieving a firm foundation for the caramel and chocolate layers.
Paying attention to baking times and cooling is essential for achieving perfect results. Allowing the bars to cool completely will help set the layers and make them easier to cut into uniform pieces. With a little patience, you’ll have a batch of bars that are both visually appealing and delicious.
Key Technique for Perfect Homemade Chocolate Caramel Bars
The most important technique in this recipe is the layering and baking process. By baking the bottom layer first, you create a sturdy base that can hold the caramel without becoming soggy. Ensuring that each layer is evenly spread and fully baked will result in bars that cut cleanly and maintain their shape.
Homemade Chocolate Caramel Bars
📋 Ingredients
Main Ingredients
- 1 cup butterRoom temperature
- 1 cup brown sugarPacked
- 1 cup corn syrupLight or dark
- 1 can sweetened condensed milk14 oz
- 1 tsp vanilla extractFor flavor
For the Sauce
- 1 cup unsalted butterMelted
- 1 cup granulated sugarFor sweetness
- 1 cup all-purpose flourFor structure
- 1 cup rolled oatsFor texture
- 1 cup semi-sweet chocolate chipsFor chocolate flavor
- 2 large eggsBinding agent
- 1 tsp vanilla extractFor flavor
- 1/2 tsp baking sodaLeavening agent
- 1/2 tsp saltEnhances flavor
Instructions
Preheat the Oven
Preheat your oven to 350°F (175°C) and line a 9x13 inch baking dish with parchment paper.
Mix Dry Ingredients
In a large bowl, combine flour, oats, cocoa powder, baking soda, and salt.
Combine Wet Ingredients
In another bowl, whisk together melted butter, granulated sugar, brown sugar, eggs, and vanilla extract until smooth.
Combine Mixtures
Gradually add the wet ingredients to the dry ingredients, mixing until just combined. Fold in chocolate chips and nuts if using.
Spread Mixture in Pan
Spread half of the mixture evenly in the prepared baking dish. Bake for 15 minutes.
Add Caramel Layer
Remove from oven and pour caramel sauce evenly over the baked layer.
Top with Remaining Mixture
Drop spoonfuls of the remaining mixture over the caramel layer, spreading it evenly.
Bake Again
Return to oven and bake for an additional 30 minutes, or until golden brown.
Cool and Cut
Allow to cool completely in the pan before lifting out and cutting into bars.
Recipe Notes & Tips
Storage Tips
Store the bars in an airtight container in the fridge to keep them fresh. If storing for longer periods, consider wrapping them individually and freezing them. To maintain texture, avoid stacking the bars directly on top of each other.
Serving Suggestions
Serve with a scoop of vanilla ice cream on the side or drizzle with extra caramel sauce for added sweetness. They also make a delightful treat paired with coffee or tea.
Recipe Variations
Feel free to customize this recipe by adding nuts, dried fruits, or even a layer of peanut butter. You can also experiment with different types of chocolate, like dark or white chocolate, for a unique twist.